Ever wondered how to manually add a contact to a campaign sequence in Infusionsoft?
Or perhaps ever wondered the best way to add a contact to a campaign sequence in Infusionsoft?
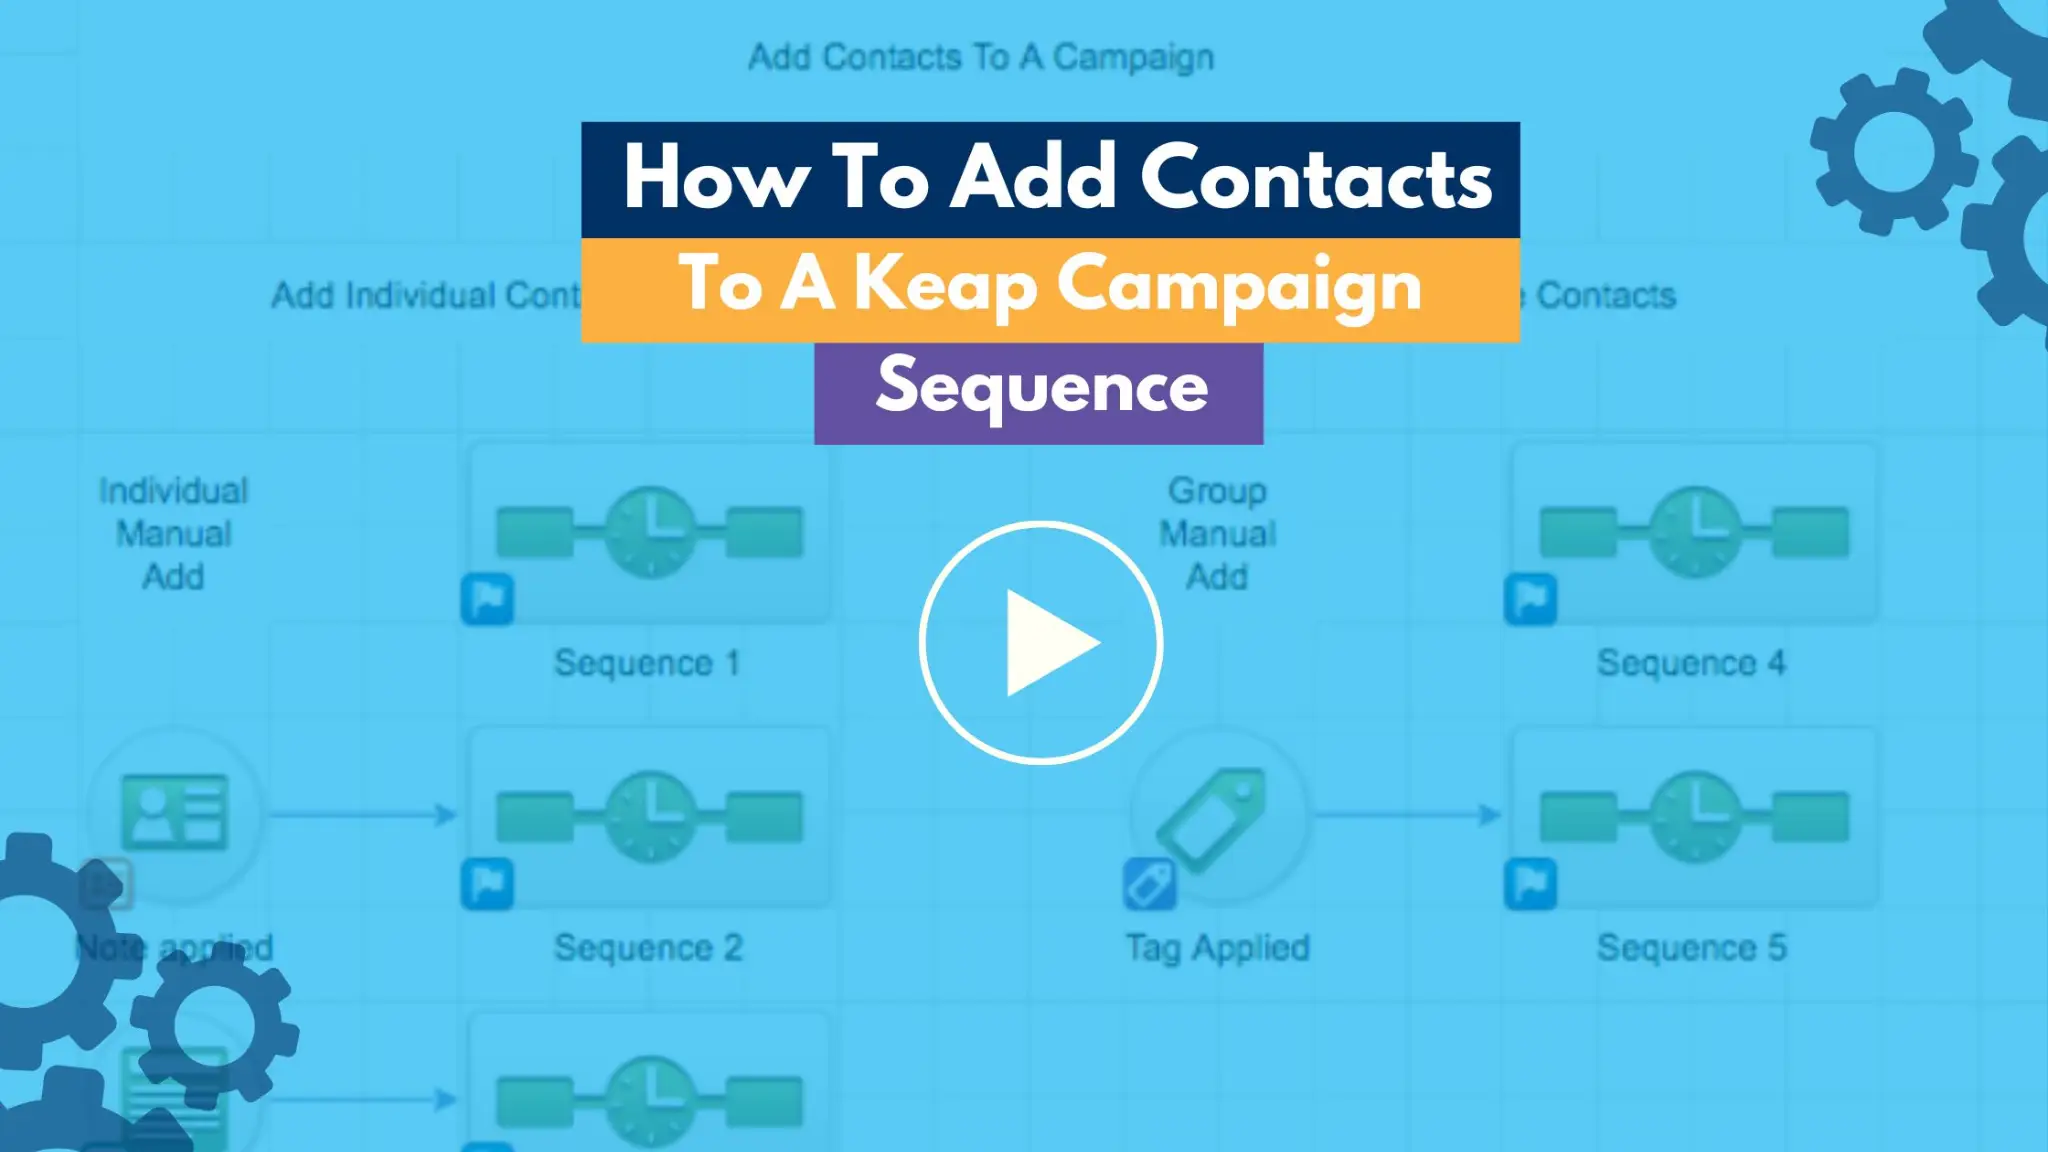
There are five main ways on how to add a contact to a campaign sequence:
- Manual Add – Individual
- Campaign Goal – Apply Note
- Campaign Goal – Internal Form
———————————————
- Manual Add – Group
- Campaign Goal – Tag
As to the best method to use, depends on a few key factors.
- Will you need to add contacts regularly into a campaign?
- Do you need to record it as history on the contacts record (for easy reference later of when the contact was added to the sequence)?
- Will the contact need to re-enter this sequence again in the future?
- Will you need to do this in bulk (more than 1 record at a time)?
- Do you need any additional data (you may not have) in order to add them into a sequence (e.g. phone number, postal address etc)
Let’s talk about each method further and the factors that make each potentially the best method.
1. Manual Add – Individual
This approach is ideal when you need to manually add a contact to a sequence, but this wouldn’t be something you would typically need to do regularly.
This is best for when you only need to do one or maybe a couple of contacts on a rare occasion.
Example – Someone has changed their email address and need to have a customer onboarding sequence started for them again as they don’t have access to the old email anymore.
How to do it:
- Find the contact
- Go to the Campaigns tab
- Select “Add To Sequence”
- Select the relevant campaign and then sequence (of course you need to know the names of the one that you want to put them in)
- Once you’ve found the right sequence, select “Add”
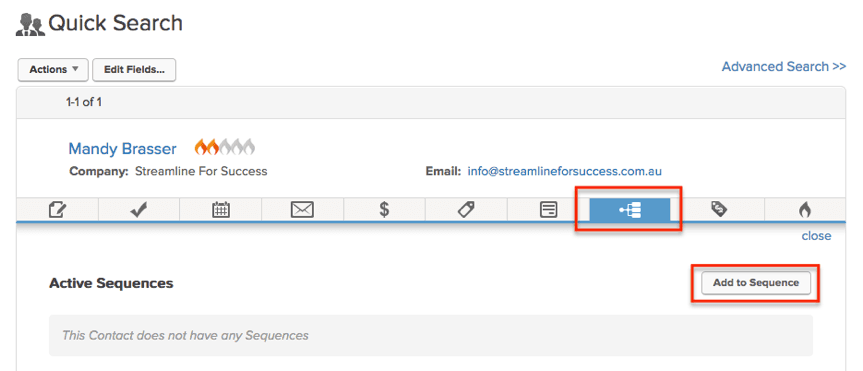
With this approach, there is no history (unless there are tags being applied within the sequence) that the contact has been added into the sequence on that date.
2. Campaign Goal – Apply Note
This approach is good if it’s really driven by action/inaction of a specific contact, plus a bonus if you want to capture the history on the contact record.
Example – A new customer has been added to a Facebook group. This is the manual step that needs to be done by someone in your business (as there is no integration available) but is based on the specific actions taken by the contact.
How to do it:
- Setup the “Note Applied” goal before the sequence
- Mark as ready
- Publish the campaign
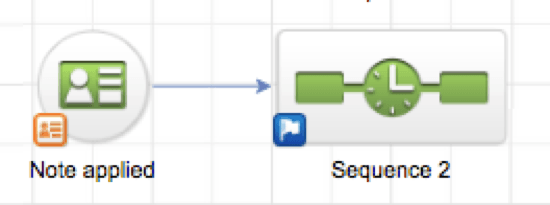
- Find the contact
- Go to the Notes tab
- Select “Add Note
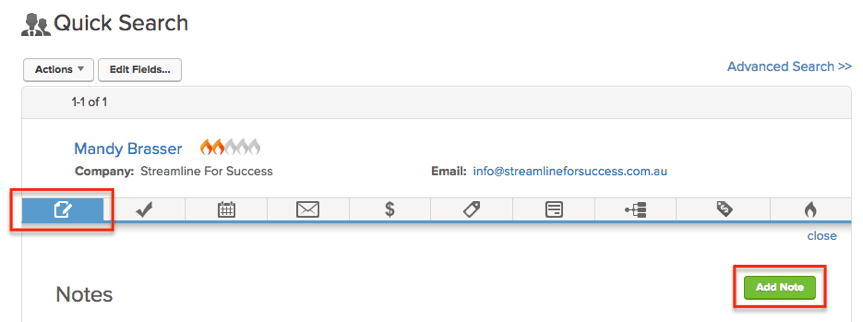
- Go to the Template dropdown
- Select the Note Applied goal that you created in the campaign
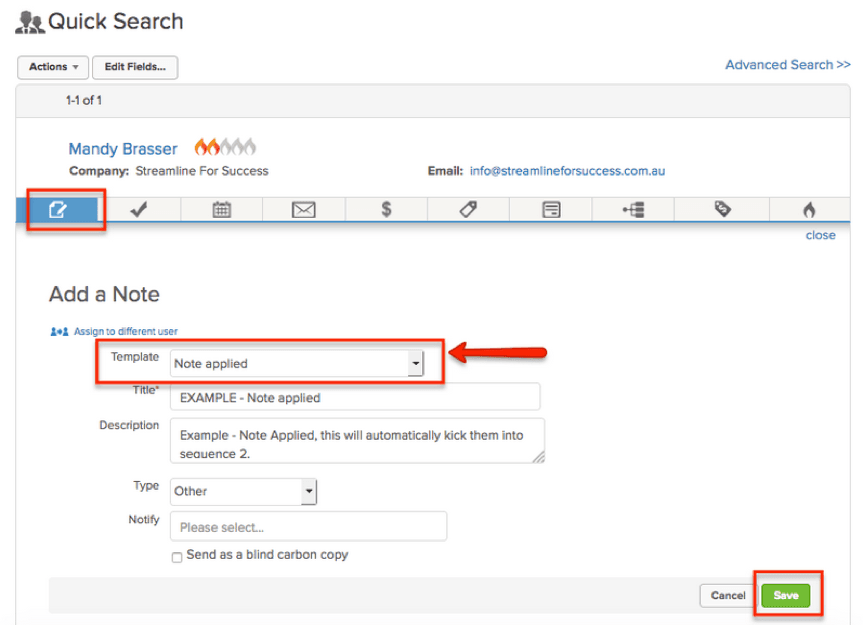
- Review and make sure that’s it
- Select “Save”
3. Campaign Goal – Internal Form
This approach is ideal when you are doing this on one contact at a time and you require additional information.
Example – You want to add them to a sequence with some follow-up emails and there is a task for someone in the team to call the contact, therefore a phone number is required.
How to do this:
- Create an internal form that includes the fields that you require
- Mark as ready
- Publish the campaign
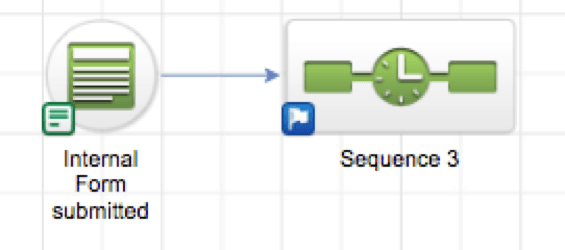
- Find the contact
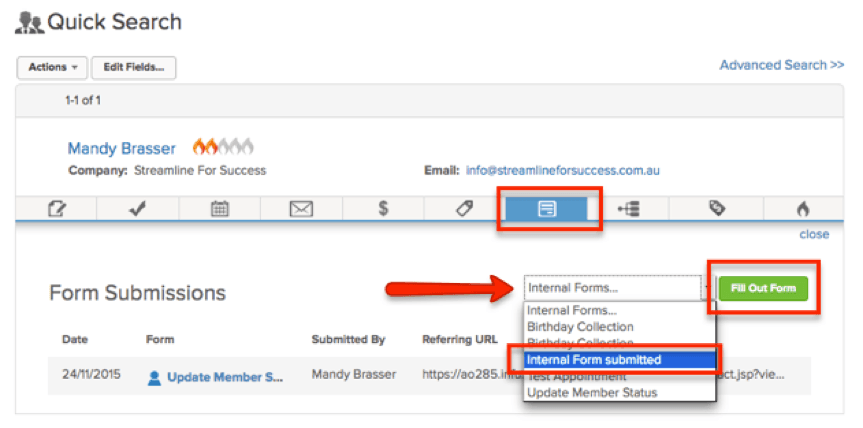
- Go to the Internal Forms tab
- Dropdown the Internal Forms
- Find the newly created internal form name that you’ve created
- Select “Fill Out Form”
- Complete the form
- Select “Save”
4. Manual Add – Group
This approach is ideal if you want to add a number of contacts AND you DO NOT want any historical reference on the contact record when they were added (unless there is something being recorded within the sequence).
Example – You want to add 50 people to a sequence to nurture prospects to register for a free event (we have a tag in the sequence indicating that they are being invited).
How to do this:
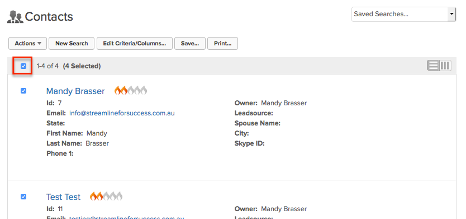
- Do a contact search (with the relevant criteria of who you want to add to the sequence)
- Select all contacts you’d like added to the sequence
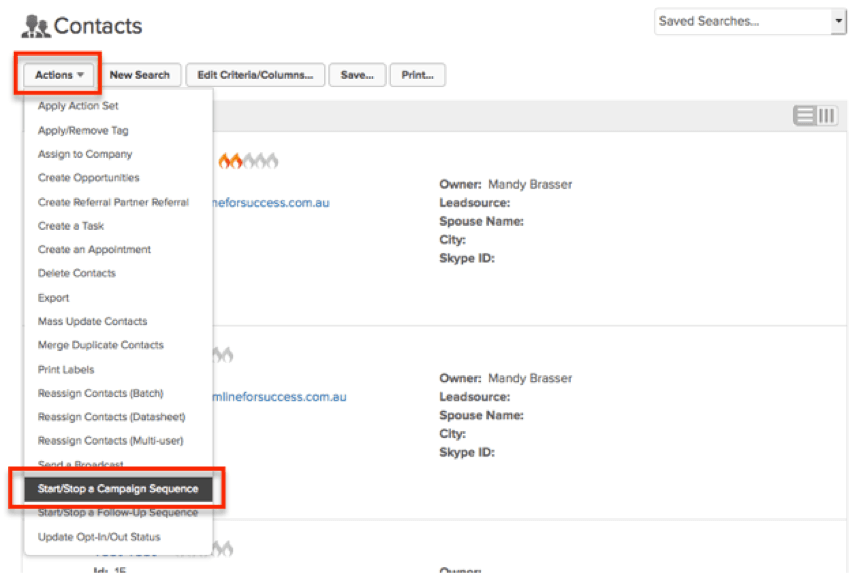
- Go to “Actions”
- Select the option “Start/Stop a Campaign Sequence”
- Make sure the number of contacts align with what you selected
- Select “Start”
- Select the campaign name
- Select the sequence name
- Then select “Process Action”

Once the contacts have been processed, it’s always good to check that your contacts were added to the right sequence after doing this process.
Head into the campaign and check out the Reporting view.
5. Campaign Goal – Tag
This approach is the best when you have a number of contacts that you want to add to a campaign sequence in one go, you want to have a record of them being added and that you don’t need any additional information.
Example – 100 people purchased offline at a supplier event and you want to add them into the customer onboarding sequence. Note that they would only ever purchase this product once.
How to do it:
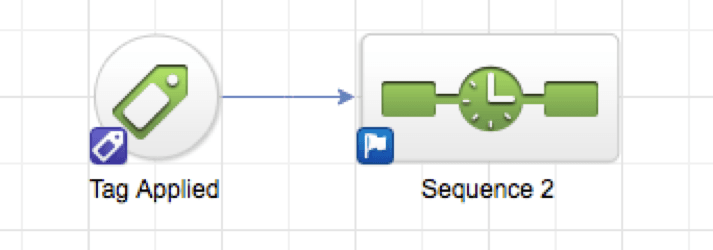
- Setup the “Tag” goal before the sequence (take note of the tag)
- Publish the campaign
- Do a contact search (with the relevant criteria of who you want to add to the sequence)
- Select all contacts you’d like added to the sequence

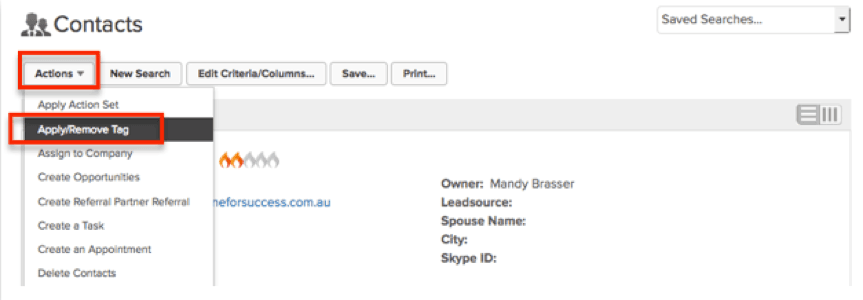
- Go to “Actions”
- Select the option “Apply/Remove Tag”
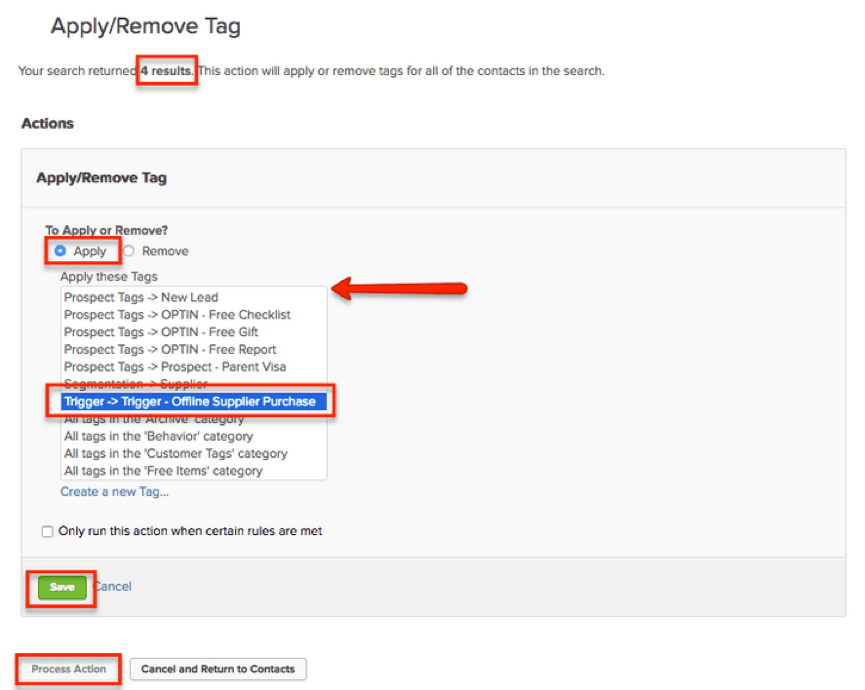
- Make sure the number of contacts align with what you selected
- Select “Apply”
- Select the relevant tag that you setup in the campaign
- Select “Save” (once you select Save the button will unhide for you to use)
- Select “Process Action”
Remember! With this approach if you wish to use the tag goal to trigger the campaign again, you need to be mindful if a contact already has that tag on their record, the tag cannot be reapplied.
Therefore, if there is a need to re-enter the same contacts into the sequence, you’ll need to either remove this tag from those contacts so they can have the tag reapplied OR configure a new tag for that tag goal.
EXTRA TIP – Make sure that your sequences have unique names. This helps to ensure that you’re adding contacts to the right sequences.
Those are the five common methods of adding contacts to a campaign sequence in Infusionsoft.
Please be mindful of how often you may need to do this, if you want to capture the history on the contact’s record, how many people you’re processing and finally if you need additional data captured at the time of kicking them off.
Happy adding contacts to campaign sequences!
(NOTE: Want The Essential Infusionsoft Tag Guide? Access the latest version of this tagging framework, see it in action in a real campaign and discover the immediate steps you must take to have tags work effectively in your business. Get your guide here.)
